Build a local blockchain
Please read Substrate to Polkadot SDK page first.
As you learned in Blockchain basics, a blockchain consists of decentralized computers—called nodes—to form a network.
Substrate provides a flexible, open, and extensible development environment that allows you to design and build fully-customized blockchain nodes to suit your application or business model needs.
Get started
The first step in becoming a blockchain developer is to learn how to compile and launch a single local blockchain node. In this tutorial, you'll build and start a single node blockchain using the node template.
The Substrate node template provides a working single-node blockchain that you can run locally in your development environment. The node template includes several predefined components—such as user accounts and account balances—so that you can experiment with performing common tasks. Without making any changes to the template, you can run a functional node that produces blocks and allows transactions.
After you start the local blockchain node, this tutorial illustrates how you can use a Substrate front-end template to view information about blockchain activity and submit a transaction.
Who is this tutorial for?
This tutorial provides a basic introduction to Substrate and prepares a minimal working development environment that you can use to explore further in additional tutorials. It is intended for anyone interested in learning about Substrate and blockchain development. The tutorial assumes you have no prior experience or knowledge of Substrate. You don't need any programming or blockchain experience to complete this tutorial. This is just the first step, but hopefully, it inspires you to continue your journey.
How much time do you need to complete this tutorial?
This tutorial requires compiling Rust code and takes approximately one to two hours to complete.
Before you begin
For this tutorial, you download and use working code. Before you begin, verify the following:
- You have good internet connection and access to a shell terminal on your local computer.
- You are generally familiar with software development and use command-line interfaces.
- You are generally familiar with blockchains and smart contract platforms.
- You have installed Rust and set up your development environment as described in Install.
Tutorial objectives
By completing this tutorial, you will accomplish the following objectives:
- Compile the node template and start a local Substrate-based blockchain.
- Install a front-end template to interact with the local blockchain node.
- Use the front-end template to submit a transaction and view the result.
Compile a Substrate node
The Substrate node template provides a working development environment so that you can start building on Substrate right away.
If you have already compiled the node template on the local computer, you can skip this section and continue to Start the local node.
To compile the Substrate node template:
- Open a terminal shell on your computer.
-
Clone the node template repository by running the following command:
git clone https://github.com/substrate-developer-hub/substrate-node-templateThis command clones the
mainbranch. If you are familiar with Polkadot, and want to work with a specific Polkadot version, you can use the--branchcommand-line option to select the specific branch that you want to work with.Click Releases or Tags to see the latest and earlier Polkadot branches that you can use with the node template.
-
Change to the root of the node template directory by running the following command:
cd substrate-node-templateCreate a new branch to contain your work:
git switch -c my-learning-branch-yyyy-mm-ddReplace
yyyy-mm-ddwith any identifying information that you desire, but we recommend a numerical year-month-day format. For example:git switch -c my-learning-branch-2023-03-01 -
Compile the node template by running the following command:
cargo build --releaseYou should always use the
--releaseflag to build optimized artifacts. The first time you compile this, it takes some time to complete.It should complete with a line something like this:
Finished release [optimized] target(s) in 11m 23s
Start the local node
After your node compiles, you are ready to start exploring what it does using the front-end template.
To start the local Substrate node:
-
In the same terminal where you compiled your node, you can now start the node in development mode by running the following command:
./target/release/node-template --devThe
node-templatecommand-line options specify how you want the running node to operate. In this case, the--devoption specifies that the node runs in development mode using the predefineddevelopmentchain specification. By default, this option also deletes all active data—such as keys, the blockchain database, and networking information when you stop the node by pressing Control-c. Using the--devoption ensures that you have a clean working state any time you stop and restart the node. -
Verify your node is up and running successfully by reviewing the output displayed in the terminal.
The terminal should display output similar to this:
2022-08-16 13:43:58 Substrate Node
2022-08-16 13:43:58 ✌️  version 4.0.0-dev-de262935ede
2022-08-16 13:43:58 ❤️  by Substrate DevHub <https://github.com/substrate-developer-hub>, 2017-2022
2022-08-16 13:43:58 📋 Chain specification: Development
2022-08-16 13:43:58 🏷  Node name: limping-oatmeal-7460
2022-08-16 13:43:58 👤 Role: AUTHORITY
2022-08-16 13:43:58 💾 Database: RocksDb at /var/folders/2_/g86ns85j5l7fdnl621ptzn500000gn/T/substrate95LPvM/chains/dev/db/full
2022-08-16 13:43:58 ⛓  Native runtime: node-template-100 (node-template-1.tx1.au1)
2022-08-16 13:43:58 🔨 Initializing Genesis block/state (state: 0xf6f5…423f, header-hash: 0xc665…cf6a)
2022-08-16 13:43:58 👴 Loading GRANDPA authority set from genesis on what appears to be first startup.
2022-08-16 13:43:59 Using default protocol ID "sup" because none is configured in the chain specs
2022-08-16 13:43:59 🏷  Local node identity is: 12D3KooWCu9uPCYZVsayaCKLdZLF8CmqiHkX2wHsAwSYVc2CxmiE
...
...
...
...
2022-08-16 13:54:26 💤 Idle (0 peers), best: #3 (0xcdac…26e5), finalized #1 (0x107c…9bae), ⬇ 0 ⬆ 0
If the number after
finalizedis increasing, your blockchain is producing new blocks and reaching consensus about the state they describe.We'll explore the details of the log output in a later tutorial. For now, it's only important to know that your node is running and producing blocks.
- Keep the terminal that displays the node output open to continue.
Install the front-end template
The front-end template uses ReactJS to render a web browser interface that enables you to interact with the Substrate-based blockchain node. You can use this Front-end template as a starting point for creating user interfaces for your own projects in future.
The front-end template requires Yarn and Node.js. If you don't have these tools, install them first.
To install the front-end template:
- Open a new terminal window on your computer.
-
Check whether
nodeis installed on your local computer by running the following command:node --versionIf you have
nodeinstalled, this command returns a version number likev19.7.0.If the command doesn’t return a version number, download and install
nodeby following the instructions for the operating system you use on the Node.js website, or by installing and using thenvmnode version manager.The
nodeversion should be at least v14 to run the front-end template. -
Check whether
yarnis installed on your local computer by running the following command:yarn --versionThe
yarnversion should be at least v3 to run the front-end template. You can useyarn versionand specify a version number to updateyarnif you have an older version installed. If the command doesn’t return a version number, or if you have any questions about installing a particularyarnversion, follow the instruction on the Yarn website to installyarn. -
Clone the front-end template repository by running the following command:
git clone https://github.com/substrate-developer-hub/substrate-front-end-template -
Change to the root of the front-end template directory by running the following command:
cd substrate-front-end-template -
Install the dependencies for the front-end template by running the following command:
yarn install
Start the front-end template
The Substrate front-end template consists of user interface components to enable you to interact with the Substrate node and perform a few common tasks.
To use the front-end template:
- Verify that your current working directory is the root directory where you installed the front-end template in the previous section.
-
Start the front-end template by running the following command:
yarn startTypically, running the
yarn startcommand openshttp://localhost:8000in your default browser automatically. If necessary, you can manually specify thehttp://localhost:8000URL to view the front-end template.The top section has an Account selection list for selecting the account to work with when you want to perform on-chain operations. The top section of the template also displays information about the chain to which you're connected.
![Front-end template top section]()
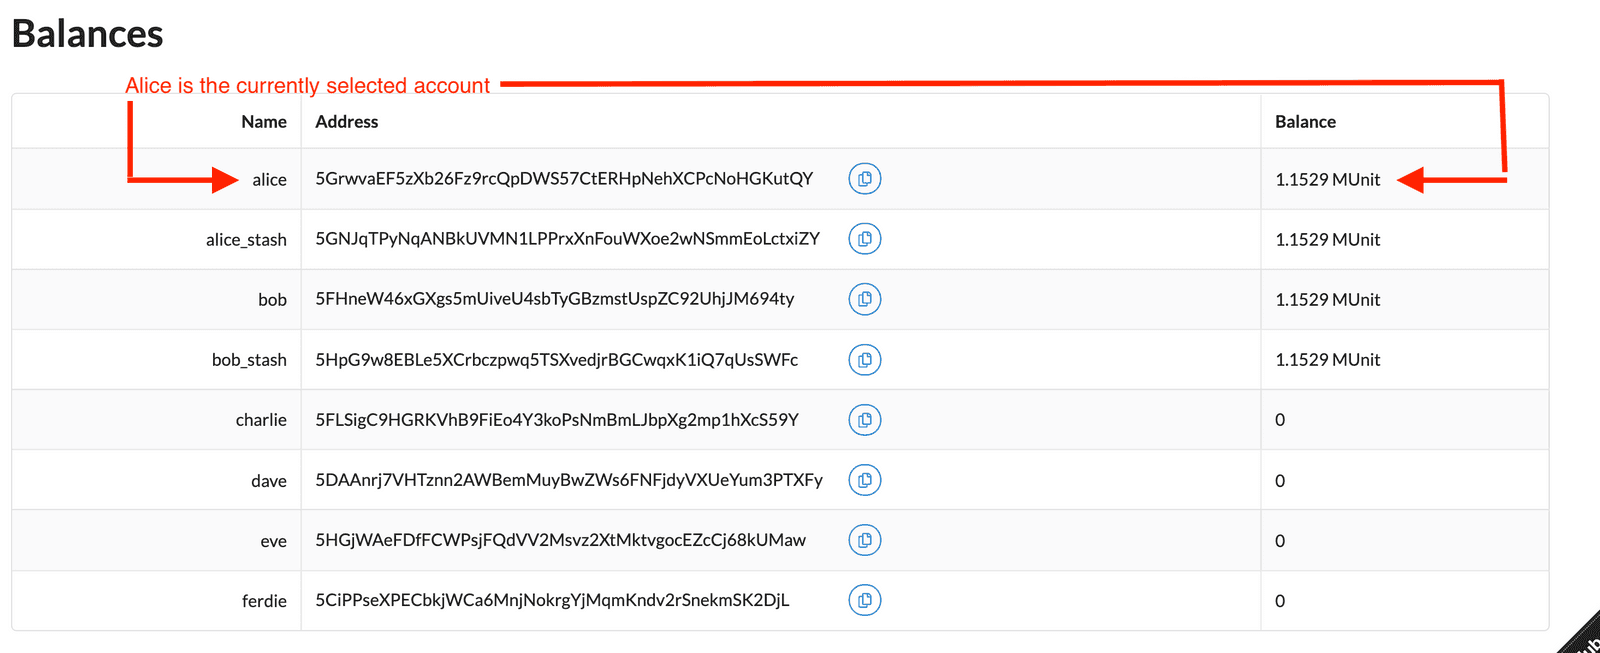
You might also notice that the front-end template displays a Balances table with some predefined accounts and that a few of those accounts are preconfigured with funds. You can use this sample data to try out operations like transferring funds.
![Predefined accounts and balances]()
Transfer funds from an account
Now that you have a blockchain node running on your local computer and you have a front-end template available for performing on-chain operations, you are ready to explore different ways to interact with the blockchain.
By default, the front-end template includes several components that allow you to try different common tasks. For this tutorial, you can perform a simple transfer operation that moves funds from one account to another.
To transfer funds to an account:
-
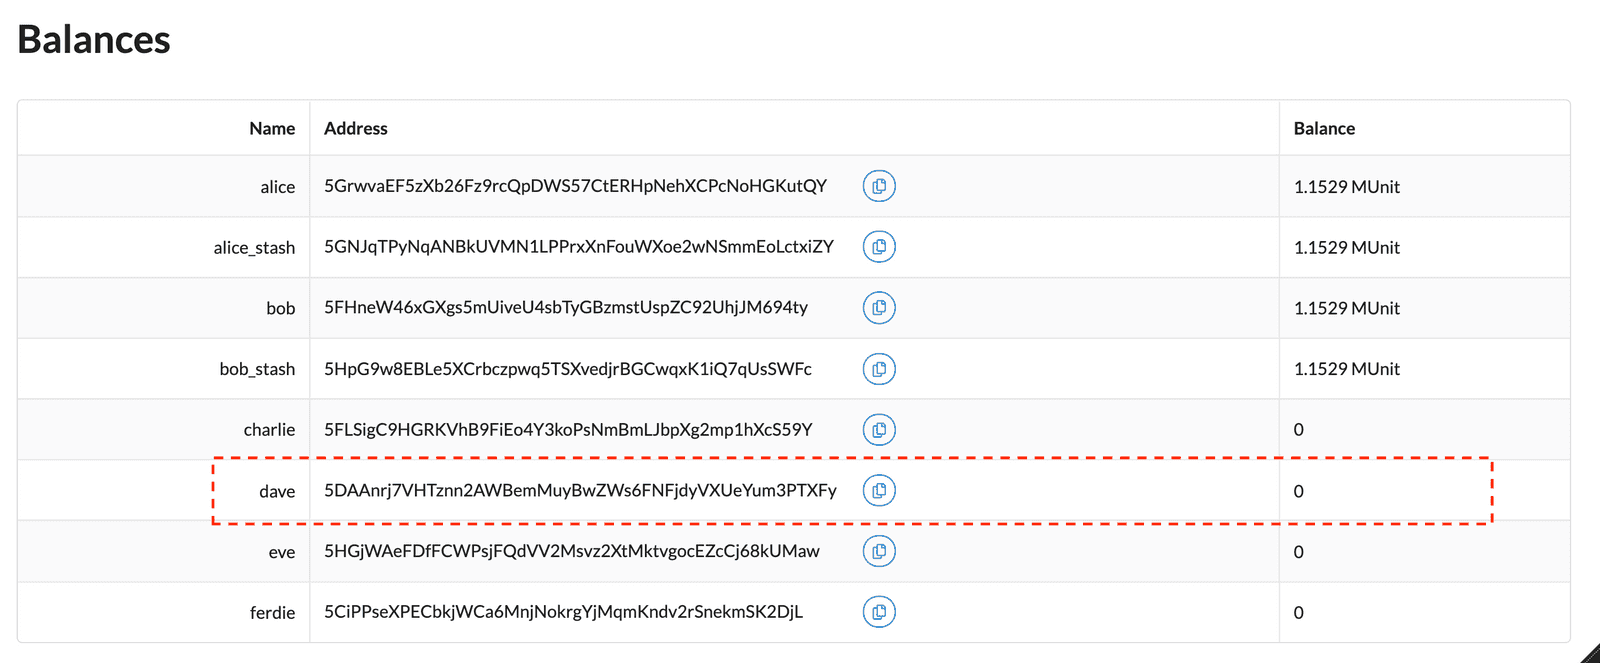
In the Balances table, notice the predefined accounts—such as dave—that have no funds associated with them.
![Locate an account with zero funds]()
Under the Balances table, the front-end template also displays a Transfer component. You use this component to transfer funds from one account to another.
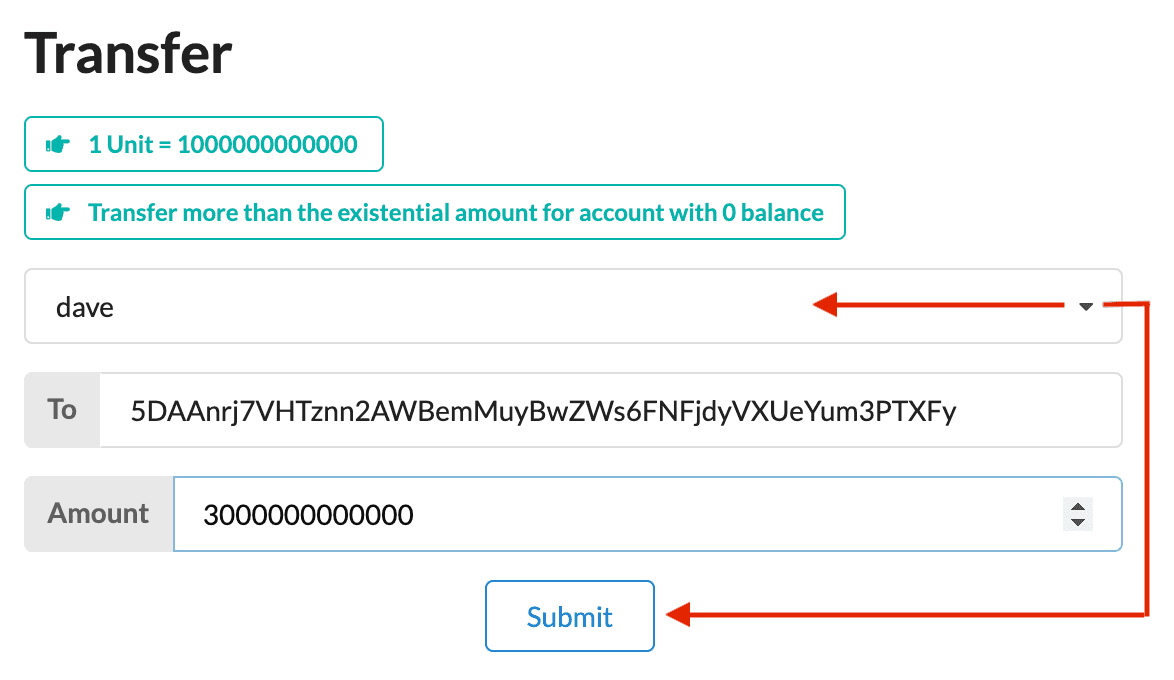
- Select dave from the list of available accounts to populate the address to which you are transferring funds.
-
Specify at least 1000000000000 as the amount to transfer, then click Submit.
![Transfer funds to an account]()
-
Notice that the values in Balances table is updated with the transfer.
![Updated balance displayed]()
-
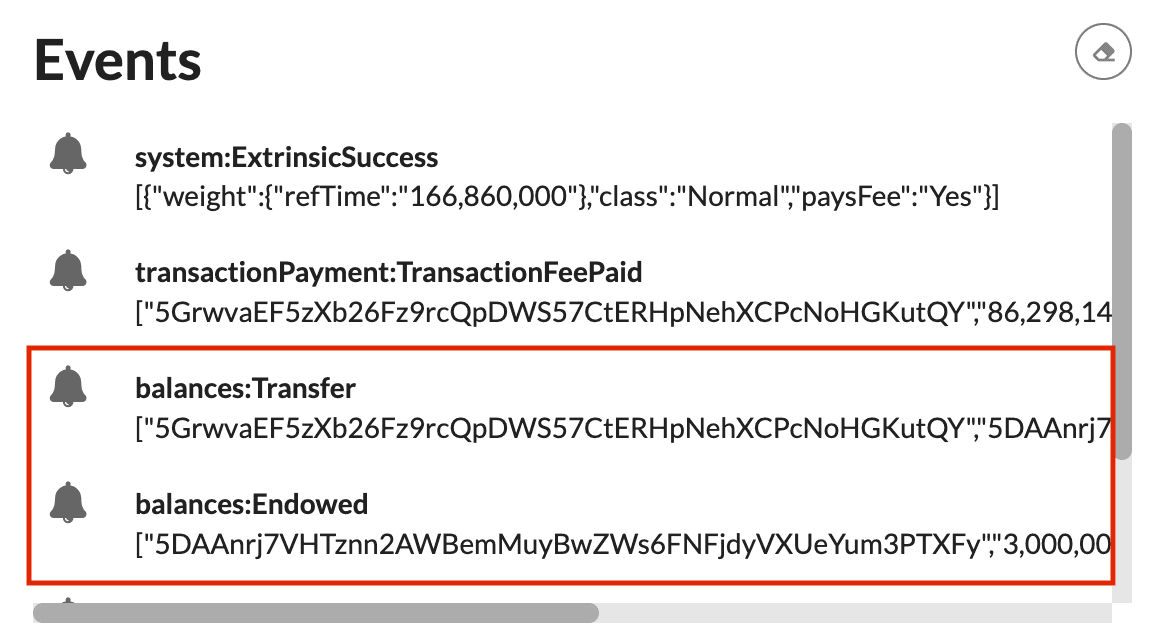
Check the Events component to see events related to the transfer you just completed.
The Substrate blockchain reports the result of asynchronous operations as events, so you can use the Events components to see details about each operation performed as part of the transfer. For example:
![Events recorded as results from asynchronous operations]()
-
When the transaction has been completed and included in a block, you see a confirmation message similar to the following:
😉 Finalized. Block hash: 0xa50d3f99fcea8a1611806895aa3f4d4d55fdc4989fbb2148d4856a043d01f808
Stop the local node
After a successful transfer, you can continue to explore the front-end template components or stop the local Substrate node to erase any state changes you have made.
Because you specified the --dev option when you started the node, stopping the local node stops the blockchain and purges all persistent block data so that you can start with a clean state next time you start the node.
To stop the local Substrate node:
- Return to the terminal shell where the node output is displayed.
- Press Control-c to terminate the running process.
- Verify your terminal returns to the terminal prompt in the
substrate-node-templatedirectory.
Next steps
Congratulations!
In this tutorial, you learned:
- How to start a working Substrate-based blockchain node using the node template.
- How to view and interact with the blockchain node using a front-end user interface.
- How to make a simple transfer from one account to another.
The front-end template includes several additional components for you to experiment with while you're connected to a local development node. You can explore these components on your own or learn more in the following topics:


