Authorize specific nodes
In Add trusted nodes, you saw how to build a simple network with a known set of validator nodes. That tutorial illustrated a simplified version of a permissioned network. In a permissioned network, only authorized nodes are allowed to perform specific network activities. For example, you might grant some nodes the permission to validate blocks and other nodes the permission to propagate transactions.
A blockchain with nodes that are granted specific permissions is different from a public or permissionless blockchain. In a permissionless blockchain, anyone can join the network by running the node software on suitable hardware. In general, a permissionless blockchain offers greater decentralization of the network. However, there are use cases where creating a permissioned blockchain might be appropriate. For example, a permissioned blockchain would be suitable for the following types of projects:
- For a private or consortium network, such as a private enterprise or a non-profit organization.
- In highly-regulated data environments, such as healthcare, finance, or business-to-business ledgers.
- For testing of a pre-public blockchain network at scale.
This tutorial illustrates how you can build a permissioned network with Substrate by using the node authorization pallet.
Node authorization and ownership
The node-authorization pallet is a prebuilt FRAME pallet that enables you to manage a configurable set of nodes for a network.
Each node is identified by a peer identifier (PeerId).
Each peer identifier is owned by one and only one account owner (AccountId) that claims the node.
There are two ways you can authorize a node to join the network:
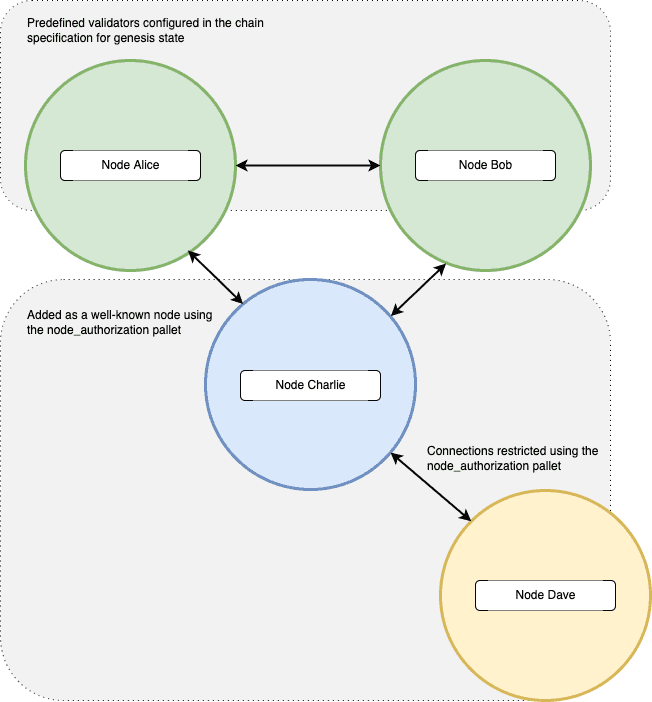
- By adding the peer identifier to the list of predefined nodes in the chain specification file as part of the genesis configuration for the chain. You must be approved by the governance mechanism for the chain or have access to the root account for the Sudo pallet in the network to do this.
- By asking for a paired peer connection from a specific node. You can add connections between nodes by using predefined node peer identifiers or by using the peer identifiers generated from the public and private keys for each of the nodes.
As the following diagram suggests, this tutorial illustrates both authorization methods, with the peer identifiers for Alice and Bob defined in the chain specification and the additional nodes added using the node authorization pallet.
Note that any user can claim to be the owner of a PeerId.
To protect against false claims, you should claim the node identifier before you start the node.
After you start the node, its PeerID is visible to the network and anyone could subsequently claim it.
As the owner of a node, you can add and remove connections for your node. For example, you can manipulate the connection between a predefined node and your node or between your node and other non-predefined nodes. You can't change the connections for predefined nodes. They are always allowed to connect with each other.
The node-authorization pallet uses an offchain worker to configure its node connections.
Make sure to enable the offchain worker when you start the node because it is disabled by default for non-authority nodes.
Before you begin
Before you begin, verify the following:
- You have configured your environment for Substrate development by installing Rust and the Rust toolchain.
- You have completed Build a local blockchain and have the Substrate node template installed locally.
- You have completed the Add trusted nodes tutorial.
- You are generally familiar with peer-to-peer networking in Substrate.
Tutorial objectives
By completing this tutorial, you will accomplish the following objectives:
- Check out and compile the node template.
- Add the node authorization pallet to the node template runtime.
- Launch multiple nodes and authorize new nodes to join.
Build the node template
If you have completed previous tutorials, you should have the Substrate node template repository available locally.
- Open a terminal shell on the computer where you have Substrate node template repository.
-
Change to the root of the node template directory, if necessary, by running the following command:
cd substrate-node-template -
Switch to a working branch for the repository if you want to save your changes by running a command similar to the following:
git switch -c my-wip-branch -
Compile the node template by running the following command:
cargo build --releaseThe node template should compile without any errors. If you encounter issues when you compile, you can try the troubleshooting tips in Troubleshoot Rust issues.
Add the node authorization pallet
Before you can use a new pallet, you must add some information about it to the configuration file that the compiler uses to build the runtime binary.
For Rust programs, you use the Cargo.toml file to define the configuration settings and dependencies that determine what gets compiled in the resulting binary.
Because the Substrate runtime compiles to both a native Rust binary that includes standard library functions and a WebAssembly (Wasm) binary that does not include the standard library, the Cargo.toml file controls two important pieces of information:
- The pallets to be imported as dependencies for the runtime, including the location and version of the pallets to import.
- The features in each pallet that should be enabled when compiling the native Rust binary.
By enabling the standard (
std) feature set from each pallet, you can compile the runtime to include functions, types, and primitives that would otherwise be missing when you build the WebAssembly binary.
For general information about adding dependencies in Cargo.toml files, see Dependencies in the Cargo documentation.
For information about enabling and managing features from dependent packages, see Features in the Cargo documentation.
Add node-authorization dependencies
To add the node-authorization pallet to the Substrate runtime:
- Open a terminal shell and change to the root directory for the node template.
- Open the
runtime/Cargo.tomlconfiguration file in a text editor. -
Locate the
[dependencies]section and add thepallet-node-authorizationcrate to make it available to the node template runtime.[dependencies] pallet-node-authorization = { default-features = false, version = "4.0.0-dev", git = "https://github.com/paritytech/substrate.git", branch = "polkadot-v1.0.0" }This line imports the
pallet-node-authorizationcrate as a dependency and specifies the following configuration details for the crate:- The pallet features are not enabled by default when compiling the runtime.
- The version identifier for the crate.
- The repository location for retrieving the
pallet-node-authorizationcrate. - The branch for retrieving the crate.
Note that you should use the same branch and version information for all pallets to ensure that they are compatible with each other. Using pallets from different branches can result in compiler errors. This example illustrates adding pallets to the
Cargo.tomlfile if the other pallets usebranch = "polkadot-v1.0.0". -
Add the
pallet-node-authorization/stdfeatures to the list offeaturesto enable when compiling the runtime.[features] default = ['std'] std = [ ... "pallet-node-authorization/std", # add this line ... ]This section specifies the default feature set to compile for this runtime is the
stdfeatures set. When the runtime is compiled using thestdfeature set, thestdfeatures from all of the pallets listed as dependencies are enabled. For more detailed information about how the runtime is compiled as a native Rust binary with the standard library and as a WebAssembly binary using theno_stdattribute, see Build process.If you forget to update the
featuressection in theCargo.tomlfile, you might seecannot find functionerrors when you compile the runtime binary. -
Check that the new dependencies resolve correctly by running the following command:
cargo check -p node-template-runtime --release
Add an administrative rule
To simulate governance in this tutorial, you can configure the pallet to use the EnsureRoot privileged function that can be called using the Sudo pallet.
The Sudo pallet is included in the node template by default and enables you to make calls through the root-level administrative account.
In a production environment, you would use more realistic governance-based checking.
To enable the EnsureRoot rule in your runtime:
- Open the
runtime/src/lib.rsfile in a text editor. -
Add the following line to the file:
use frame_system::EnsureRoot;
Implement the Config trait
Every pallet has a Rust trait called Config.
The Config trait is used to identify the parameters and types that the pallet needs.
Most of the pallet-specific code required to add a pallet is implemented using the Config trait.
You can review what you need to implement for any pallet by referring to its Rust documentation or the source code for the pallet.
For example, to see what you need to implement for the Config trait in the node-authorization pallet, you can refer to the Rust documentation for pallet_node_authorization::Config.
To implement the node-authorization pallet in your runtime:
- Open the
runtime/src/lib.rsfile in a text editor. -
Add the
parameter_typessection for the pallet using the following code:parameter_types! { pub const MaxWellKnownNodes: u32 = 8; pub const MaxPeerIdLength: u32 = 128; } -
Add the
implsection for theConfigtrait for the pallet using the following code:impl pallet_node_authorization::Config for Runtime { type RuntimeEvent = RuntimeEvent; type MaxWellKnownNodes = MaxWellKnownNodes; type MaxPeerIdLength = MaxPeerIdLength; type AddOrigin = EnsureRoot<AccountId>; type RemoveOrigin = EnsureRoot<AccountId>; type SwapOrigin = EnsureRoot<AccountId>; type ResetOrigin = EnsureRoot<AccountId>; type WeightInfo = (); } -
Add the pallet to the
construct_runtimemacro with the following line of code:construct_runtime!( pub enum Runtime where Block = Block, NodeBlock = opaque::Block, UncheckedExtrinsic = UncheckedExtrinsic { /*** Add This Line ***/ NodeAuthorization: pallet_node_authorization::{Pallet, Call, Storage, Event<T>, Config<T>}, } ); - Save your changes and close the file.
-
Check that the configuration can compile by running the following command:
cargo check -p node-template-runtime --release
Add genesis storage for authorized nodes
Before you can launch the network to use node authorization, some additional configuration is needed to handle the peer identifiers and account identifiers.
For example, the PeerId is encoded in bs58 format, so you need to add a new dependency for the bs58 library in the node/Cargo.toml to decode the PeerId to get its bytes.
To keep things simple, the authorized nodes are associated with predefined accounts.
To configure genesis storage for authorized nodes:
- Open the
node/Cargo.tomlfile in a text editor. -
Locate the
[dependencies]section and add thebs58library to the node template.[dependencies] bs58 = { version = "0.4.0" } - Save your changes and close the file.
- Open the
node/src/chain_spec.rsfile in a text editor. -
Add genesis storage for nodes that are authorized to join the network using the following code:
use sp_core::OpaquePeerId; // A struct wraps Vec<u8> to represent the node `PeerId`. use node_template_runtime::NodeAuthorizationConfig; // The genesis config that serves the pallet. -
Locate the
testnet_genesisfunction that configures initial storage state for FRAME modules.For example:
/// Configure initial storage state for FRAME modules. fn testnet_genesis( wasm_binary: &[u8], initial_authorities: Vec<(AuraId, GrandpaId)>, root_key: AccountId, endowed_accounts: Vec<AccountId>, _enable_println: bool, ) -> GenesisConfig { -
Within the
GenesisConfigdeclaration, add the following code block:node_authorization: NodeAuthorizationConfig { nodes: vec![ ( OpaquePeerId(bs58::decode("12D3KooWBmAwcd4PJNJvfV89HwE48nwkRmAgo8Vy3uQEyNNHBox2").into_vec().unwrap()), endowed_accounts[0].clone() ), ( OpaquePeerId(bs58::decode("12D3KooWQYV9dGMFoRzNStwpXztXaBUjtPqi6aU76ZgUriHhKust").into_vec().unwrap()), endowed_accounts[1].clone() ), ], },In this code,
NodeAuthorizationConfigcontains anodesproperty, which is a vector with a tuple of two elements. The first element of the tuple is theOpaquePeerId. Thebs58::decodeoperation converts the human-readablePeerId—for example,12D3KooWBmAwcd4PJNJvfV89HwE48nwkRmAgo8Vy3uQEyNNHBox2—to bytes. The second element of the tuple is theAccountIdthat represents the owner of this node. This example uses the predefined Alice and Bob, identified here as endowed accounts [0] and [1]. - Save your changes and close the file.
Verify that the node compiles
Now that you have completed the code changes, you are ready to verify that the node compiles.
To compile the node:
- Change to the root of the
substrate-node-templatedirectory, if necessary: -
Compile the node by running the following command:
cargo build --releaseIf there are no syntax errors, you are ready to proceed. If there are errors, follow the instructions in the compile output to fix them then rerun the
cargo buildcommand.
Identify account keys to use
You have already configured the nodes associated with the Alice and Bob accounts in genesis storage.
You can use the subkey program to inspect the keys associated with predefined accounts and to generate and inspect your own keys.
However, if you run the subkey generate-node-key command, your node key and peer identifier are randomly generated and won't match the keys used in the tutorial.
Because this tutorial uses predefined accounts and well-known node keys, you can use the following keys for each account.
Alice
| Key type | Key value |
|---|---|
| Node key | c12b6d18942f5ee8528c8e2baf4e147b5c5c18710926ea492d09cbd9f6c9f82a |
| Peer identifier generated from the node key | 12D3KooWBmAwcd4PJNJvfV89HwE48nwkRmAgo8Vy3uQEyNNHBox2 |
| Peer identifier decoded to hex | 0x0024080112201ce5f00ef6e89374afb625f1ae4c1546d31234e87e3c3f51a62b91dd6bfa57df |
Bob
| Key type | Key value |
|---|---|
| Node key | 6ce3be907dbcabf20a9a5a60a712b4256a54196000a8ed4050d352bc113f8c58 |
| Peer identifier generated from the node key | 12D3KooWQYV9dGMFoRzNStwpXztXaBUjtPqi6aU76ZgUriHhKust |
| Peer identifier decoded to hex | 0x002408011220dacde7714d8551f674b8bb4b54239383c76a2b286fa436e93b2b7eb226bf4de7 |
The two other development accounts—Charlie and Dave—don't have well-known node keys or peer identifiers defined in the genesis configuration. For demonstration purposes, you can use the following keys for these accounts.
Charlie
| Key type | Key value |
|---|---|
| Node key | 3a9d5b35b9fb4c42aafadeca046f6bf56107bd2579687f069b42646684b94d9e |
| Peer identifier generated from the node key | 12D3KooWJvyP3VJYymTqG7eH4PM5rN4T2agk5cdNCfNymAqwqcvZ |
| Peer identifier decoded to hex | 0x002408011220876a7b4984f98006dc8d666e28b60de307309835d775e7755cc770328cdacf2e |
Dave
| Key type | Key value |
|---|---|
| Node key | a99331ff4f0e0a0434a6263da0a5823ea3afcfffe590c9f3014e6cf620f2b19a |
| Peer identifier generated from the node key | 12D3KooWPHWFrfaJzxPnqnAYAoRUyAHHKqACmEycGTVmeVhQYuZN |
| Peer identifier decoded to hex | 0x002408011220c81bc1d7057a1511eb9496f056f6f53cdfe0e14c8bd5ffca47c70a8d76c1326d |
For this tutorial, you can copy the node key to a file, then use the subkey inspect-node-key to verify the peer identifiers for Charlie and Dave.
For example, save the node key for Charlie to a file named charlie-node-key by using a command like the following:
echo -n "3a9d5b35b9fb4c42aafadeca046f6bf56107bd2579687f069b42646684b94d9e" > charlie-node-keyYou can then run the following command to verify the peer identifier:
./subkey inspect-node-key --file charlie-node-keyThe command displays the peer identifier for the Charlie node:
12D3KooWJvyP3VJYymTqG7eH4PM5rN4T2agk5cdNCfNymAqwqcvZIf you generate node keys for your own account, save the peer identifier for the node to a file so you can pass it to subkey inspect-node-key or other commands when needed.
Launch network nodes
You can now use the node keys and peer identifiers for the predefined accounts to launch the permissioned network and authorize other nodes to join.
For the purposes of this tutorial, you are going to launch four nodes. Three of the nodes are associated with predefined accounts and all three of those nodes are allowed to author and validate blocks. The fourth node is a sub-node that is only authorized to read data from a selected node with the approval of that node's owner.
Start the first node
Because you have configured genesis storage to use the well-known node keys for Alice and Bob, you can use the --alice command shortcut for --name alice --validator to start the first node.
To start the first node:
- Open a terminal shell on your computer, if necessary.
- Change to the root directory where you compiled the Substrate node template.
-
Start the first node by running the following command:
./target/release/node-template \
--chain=local \
--base-path /tmp/validator1 \
--alice \
--node-key=c12b6d18942f5ee8528c8e2baf4e147b5c5c18710926ea492d09cbd9f6c9f82a \
--port 30333 \
--rpc-port 9944
In this command, the
--node-keyoption to specify the key to be used for a secure connection to the network. This key is also used internally to generate the human-readable PeerId as shown in above section.As you might have seen in other tutorials, the command-line options used are:
--chain=localfor a local testnet (not the same as the--devflag!).--aliceto name the nodealiceand make the node a validator that can author and finalize blocks.--portto assign a port for peer-to-peer communication.--rpc-portto assign a listening port for WebSocket connections.
Start the second node
You can start the second node using the --bob command shortcut for --name bob --validator to start the second node.
To start the second node:
- Open a new terminal shell on your computer.
- Change to the root directory where you compiled the Substrate node template.
-
Start the second node by running the following command:
./target/release/node-template \
--chain=local \
--base-path /tmp/validator2 \
--bob \
--node-key=6ce3be907dbcabf20a9a5a60a712b4256a54196000a8ed4050d352bc113f8c58 \
--bootnodes /ip4/127.0.0.1/tcp/30333/p2p/12D3KooWBmAwcd4PJNJvfV89HwE48nwkRmAgo8Vy3uQEyNNHBox2 \
--port 30334 \
--rpc-port 9945
After both nodes are started, you should start to see new blocks authored and finalized in both terminal logs.
Add a third node to the list of well-known nodes
You can start the third node with the --name charlie command.
The node-authorization pallet uses an offchain worker to configure node connections.
Because the third node is not a well-known node and it will have the fourth node in the network configured as a read-only sub-node, you must include the command-line option to enable the offchain worker.
To start the third node:
- Open a new terminal shell on your computer.
- Change to the root directory where you compiled the Substrate node template.
-
Start the third node by running the following command:
./target/release/node-template \
--chain=local \
--base-path /tmp/validator3 \
--name charlie  \
--node-key=3a9d5b35b9fb4c42aafadeca046f6bf56107bd2579687f069b42646684b94d9e \
--port 30335 \
--rpc-port=9946 \
--offchain-worker always
After you start this node, you should see there are no connected peers for the node. Because this is a permissioned network, the node must be explicitly authorized to connect. The Alice and Bob nodes were configured in the genesis
chain_spec.rsfile. All other nodes must be added manually using a call to the Sudo pallet.
Authorize access for the third node
This tutorial uses the Sudo pallet for governance.
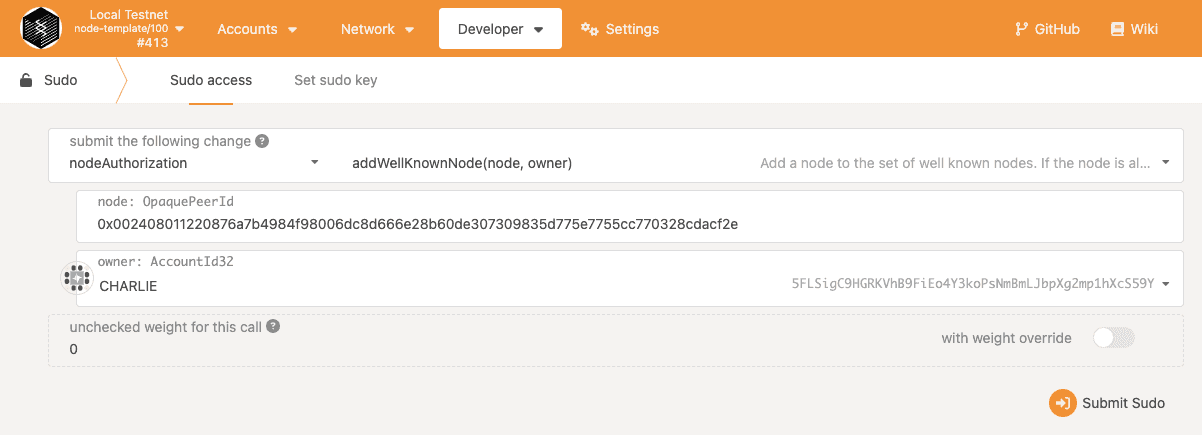
Therefore, you can use the Sudo pallet to call the addWellKnownNode function provided by node-authorization pallet to add the third node.
To keep things simple, you can use the Polkadot/Substrate Portal application to access the Sudo pallet.
- Open the Polkadot/Substrate Portal in a browser.
- Click Developer and select Sudo.
- Select nodeAuthorization and select addWellKnownNode(node, owner).
- Copy and paste the hex-encoded peer identifier for the node owned by Charlie after the required 0x prefix.
- Select Charlie as the node owner.
-
Click Submit Sudo.
![Submit a Sudo transaction to add the third node]()
-
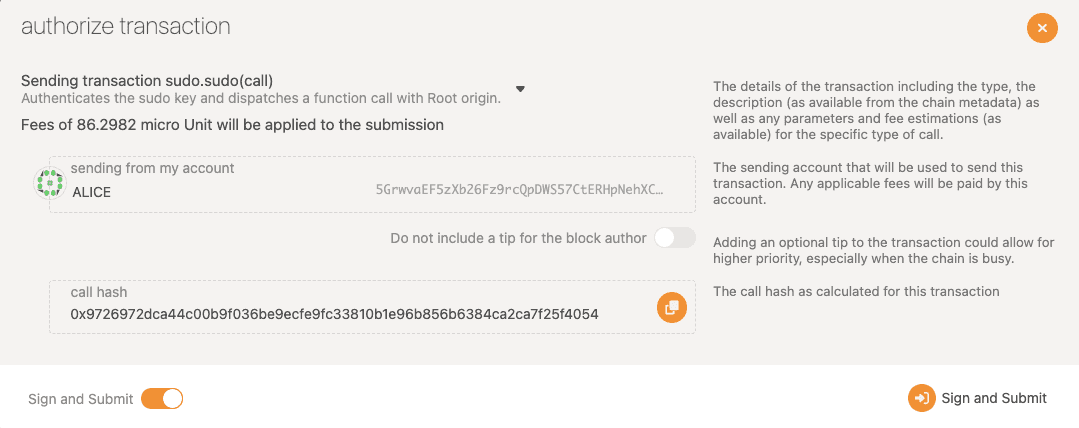
In Authorize transaction, note that the Alice development account is the default root administrative account and used as the
sudoorigin for this call, then click Sign and Submit.![Verify and authorize the transaction]()
-
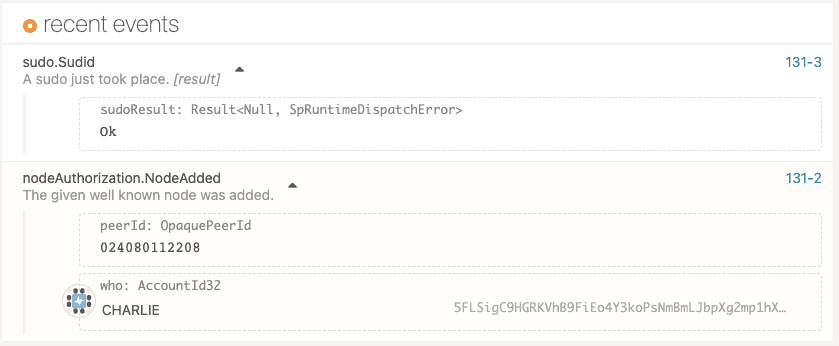
Click Network and select Explorer to view the recent transactions.
![Verify the Sudo event]()
After the transaction is included in the block, you should see the
charlienode is connected to thealiceandbobnodes, and starts to sync blocks. The three nodes can find each other using the mDNS discovery mechanism that is enabled by default in a local network. Also ensure any local firewall is configured to allow mDNS.If your nodes are not on the same local network, you should use the command-line option
--no-mdnsto disable it.
Allow connections from a sub-node
The fourth node in this network is not going to be used as a validator or added to the list of well-known nodes.
This fourth node is owned by the dave user account, but is a sub-node of the charlie node.
The sub-node can only access the network by connecting to the node owned by the charlie parent node.
It's important to remember that the parent node is responsible for any sub-node it authorizes to connect to the network.
The owner of the parent node is responsible for controlling access if the sub-node needs to be removed or audited.
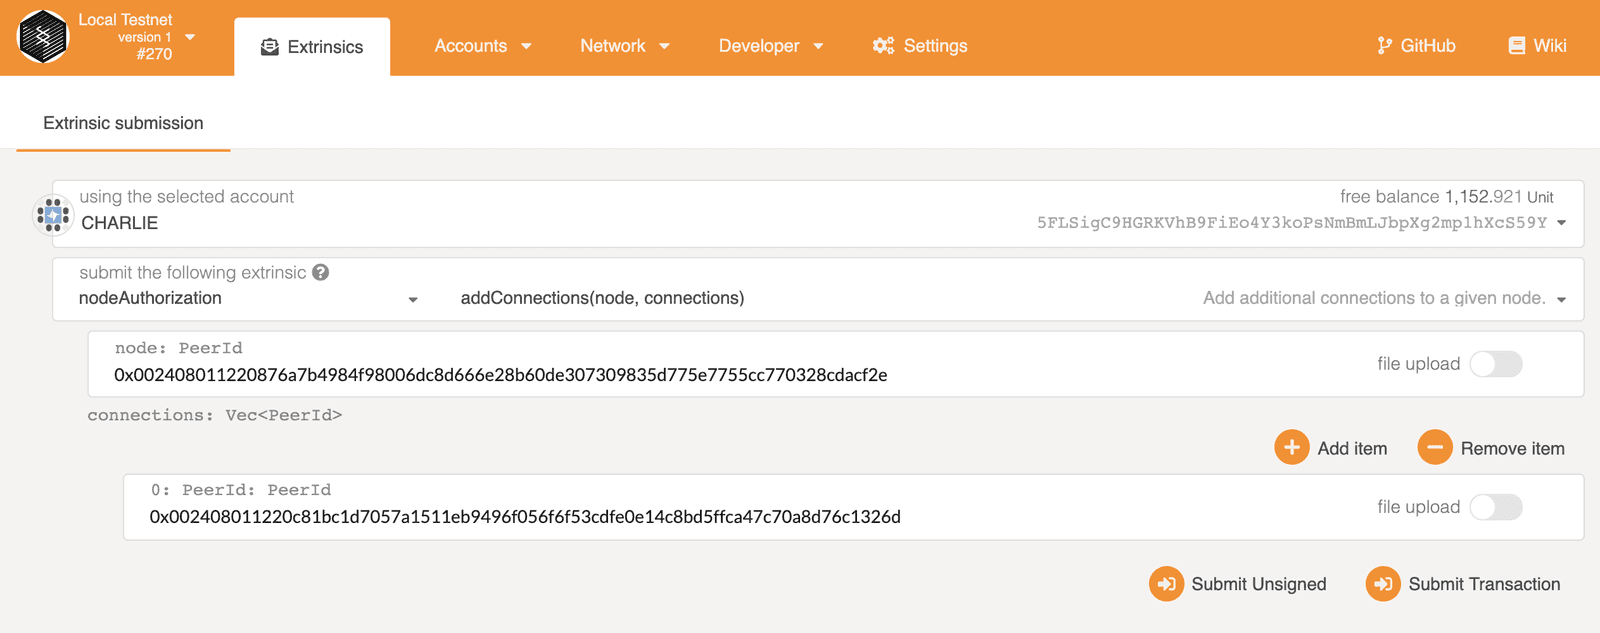
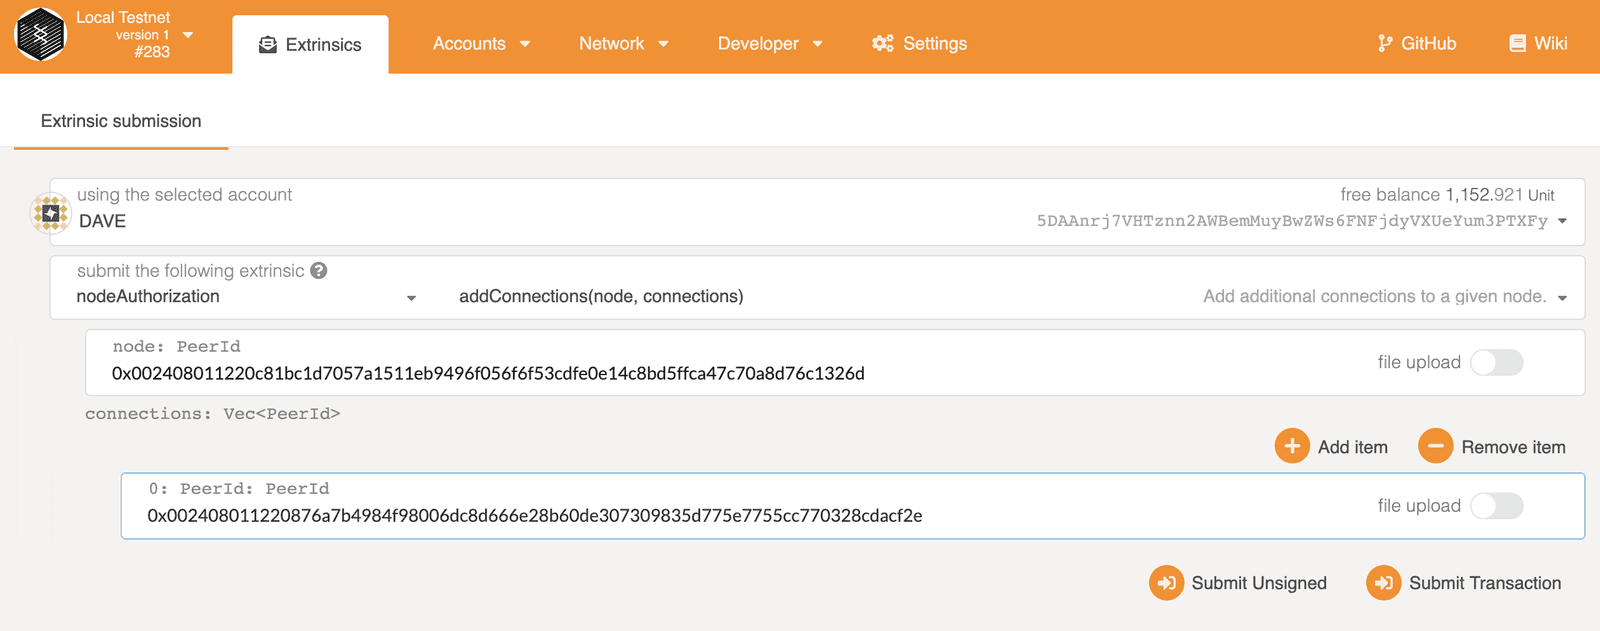
Because this is a permissioned network, Charlie must configure his node to allow the connection from the node owned by Dave. You can use the Polkadot/Substrate Portal application to grant this permission.
To allow the sub-node to access the network:
- Open the Polkadot/Substrate Portal in a browser.
- Click Developer and select Extrinsics.
- Select nodeAuthorization and select addConnections(node, connections).
- Copy and paste the hex-encoded peer identifier for the node owned by Charlie after the required 0x prefix.
- For the connections parameter, copy and paste the hex-encoded peer identifier for the node owned by Dave after the required 0x prefix, then click Submit Transaction.
-
Review the transaction details, then click Sign and Submit.
![charlie_add_connections]()
Claim the sub-node
Before starting the sub-node, the node owner should claim the peer identifier for his node.
You can use the Polkadot/Substrate Portal application to submit a transaction to claim the node owned by the dave account.
- Open the Polkadot/Substrate Portal in a browser.
- Click Developer and select Extrinsics.
- Select nodeAuthorization and select claimNode(node).
- Copy and paste the hex-encoded peer identifier for the node owned by Dave after the required 0x prefix, then click Submit Transaction.
-
Review the transaction details, then click Sign and Submit.
![dave_claim_node]()
Start the sub-node
After claiming the node peer identifier, you are ready to start the sub-node.
To start the sub-node:
- Open a new terminal shell on your computer.
- Change to the root directory where you compiled the Substrate node template.
-
Start the sub-node by running the following command:
./target/release/node-template \
--chain=local \
--base-path /tmp/validator4 \
--name dave \
--node-key=a99331ff4f0e0a0434a6263da0a5823ea3afcfffe590c9f3014e6cf620f2b19a \
--port 30336 \
--rpc-port 9947 \
--offchain-worker always
Allow connections to the sub-node
You now have a network with four nodes. However, to allow the sub-node to participate, you must configure it to allow connections from the parent node owned by Charlie. The steps are similar to the ones you previously performed to allow connections from the node owned by Dave.
- Open the Polkadot/Substrate Portal in a browser.
- Click Developer and select Extrinsics.
- Select nodeAuthorization and select addConnections(node, connections).
- Copy and paste the hex-encoded peer identifier for the node owned by Dave after the required 0x prefix.
- For the connections parameter, copy and paste the hex-encoded peer identifier for the node owned by Charlie after the required 0x prefix, then click Submit Transaction.
-
Review the transaction details, then click Sign and Submit.
![dave_add_connections]()
You should now see the sub-node has only one peer—the node that belongs to Charlie—and is synchronizing blocks from the chain. If the sub-node doesn't connect to its peer node right away, try stopping and restarting the sub-node.
Keys required to submit transactions
You should note that any account can be used to sign and submit transaction that affect the behavior of other nodes. However, to sign and submit a transaction that affects a node you don't own:
- The transaction must reference on chain data.
- You must have the signing key for an account with the required origin available in the keystore.
In this tutorial, all of the nodes have access to the development account signing keys. Therefore, you were able to sign and submit transactions that affected any connected node using account to act on behalf of Charlie or Dave. If you were building a permissioned network for a real world application, node operators would most likely only have access to their own node keys, and node owner accounts would be required to sign and submit transactions that affect the node where they have control of the signing key.
Where to go next
In this tutorial, you learned the basics of how to build a network where some nodes have limited permissions and restricted access to network resources. To learn more about the topics introduced in this tutorial, see the following resources:
