Transaction formats
Please read Substrate to Polkadot SDK page first.
This article describes in detail the data structure of signed and unsigned transactions in Substrate. This is particularly useful for understanding how the transaction pool checks incoming transactions. Parachain builders will find this useful for customizing how their transactions are formatted as well as writing client applications that need to adhere to a chosen format.
Extrinsics normally contain a signature, some data to describe if the extrinsic has passed some validity checks and a reference to the pallet and call that it is intended for. This format provides a way for applications to ensure the requirements for an extrinsic are met and correctly constructed.
- Unchecked: signed transactions that require some validation check before they can be accepted in the transaction pool. Any unchecked extrinsic contains the signature for the data being sent plus some extra data.
- Checked: inherent extrinsics which by definition don't require signature verification. Instead, they carry information on where the extrinsic comes from and some extra data.
- Opaque: used for cases when an extrinsic hasn't yet been committed to a format but can still be decoded.
Extra data can be any additional information that would be useful to attach to a transaction or inherent. For example, the nonce of the transaction, the tip for the block author, or how long the extrinsic is valid for. This information is provided by a specialized extensions that help determine the validity and ordering of extrinsics before they get included in a block.
A signed transaction might be constructed like so:
node_runtime::UncheckedExtrinsic::new_signed(
		function.clone(),                                      // some call
		sp_runtime::AccountId32::from(sender.public()).into(), // some sending account
		node_runtime::Signature::Sr25519(signature.clone()),   // the account's signature
		extra.clone(),                                         // the signed extensions
	)
How transactions are constructed
Substrate defines its transaction formats generically to allow developers to implement custom ways to define valid transactions. In a runtime built with FRAME however (assuming transaction version 4), a transaction must be constructed by submitting the following encoded data:
<signing account ID> + <signature> + <additional data>
When submitting a signed transaction, the signature is constructed by signing:
-
The actual call, composed of:
- The index of the pallet.
- The index of the function call in the pallet.
- The parameters required by the function call being targeted.
-
Some extra information, verified by the signed extensions of the transaction:
- What's the era for this transaction, i.e. how long should this call last in the transaction pool before it gets discarded?
- The nonce, i.e. how many prior transactions have occurred from this account? This helps protect against replay attacks or accidental double-submissions.
- The tip amount paid to the block producer to help incentive it to include this transaction in the block.
Then, some additional data that's not part of what gets signed is required, which includes:
- The spec version and the transaction version. This ensures the transaction is being submitted to a compatible runtime.
- The genesis hash. This ensures that the transaction is valid for the correct chain.
- The block hash. This corresponds to the hash of the checkpoint block, which enables the signature to verify that the transaction doesn't execute on the wrong fork, by checking against the block number provided by the era information.
The SCALE encoded data is then signed (i.e. (call, extra, additional)) and the signature, extra data and call data is attached in the correct order and SCALE encoded, ready to send off to a node that will verify the signed payload.
If the payload to be signed is longer than 256 bytes, it is hashed just prior to being signed, to ensure that the size of the signed data does not grow beyond a certain size.
This process can be broken down into the following steps:
- Construct the unsigned payload.
- Create a signing payload.
- Sign the payload.
- Serialize the signed payload.
- Submit the serialized transaction.
An extrinsic is encoded into the following sequence of bytes just prior to being hex encoded:
[ 1 ] + [ 2 ] + [ 3 ] + [ 4 ]
where:
[1]contains the compact encoded length in bytes of all of the following data. Learn how compact encoding works using SCALE.[2]is au8containing 1 byte to indicate whether the transaction is signed or unsigned (1 bit), and the encoded transaction version ID (7 bits).[3]if a signature is present, this field contains an account ID, an SR25519 signature and some extra data. If unsigned this field contains 0 bytes.[4]is the encoded call data. This comprises of 1 byte denoting the pallet to call into, 1 byte denoting the call to make in that pallet, and then as many bytes as needed to encode the arguments expected by that call.
The way applications know how to construct a transaction correctly is provided by the metadata interface.
An application will know how to correctly encode a transaction by using the metadata types and transaction format.
If a call doesn't need to be signed, then the first bit in [2] will be 0 and so an application will know not to try decoding a signature.
Polkadot JS Apps example:
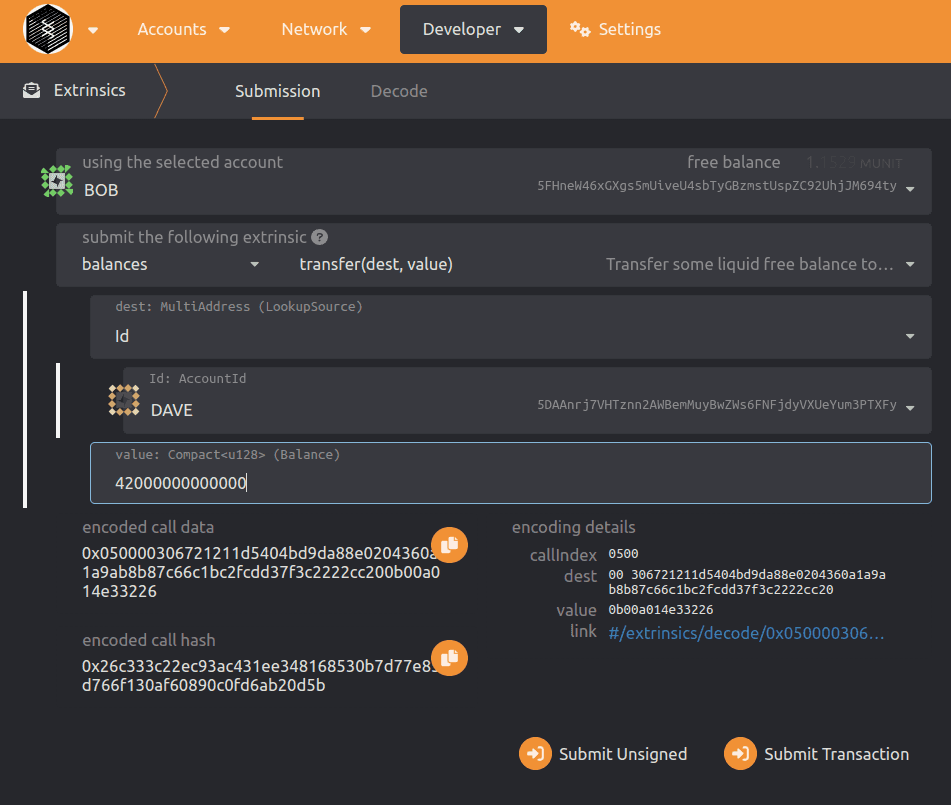
Here we demonstrate a detailed, manual extrinsic construction and submission of a balance transfer from Bob to Dave: Bob sends 42 UNITs to Dave.
- Start a node template in
--devmode (see the quick start guide for how to set this up) - Navigate to https://polkadot.js.org/apps/?rpc=ws%3A%2F%2F127.0.0.1%3A9944#/extrinsics
- Set
Bobas sender and selectbalancespallet and thetransfer(dest, value)call - Set
MultiAddresstoIdand theAccountIDtoDavefor thedest - Set
valueto42000000000000(this is42 UNITas defined in the chain spec of the node template) - Click
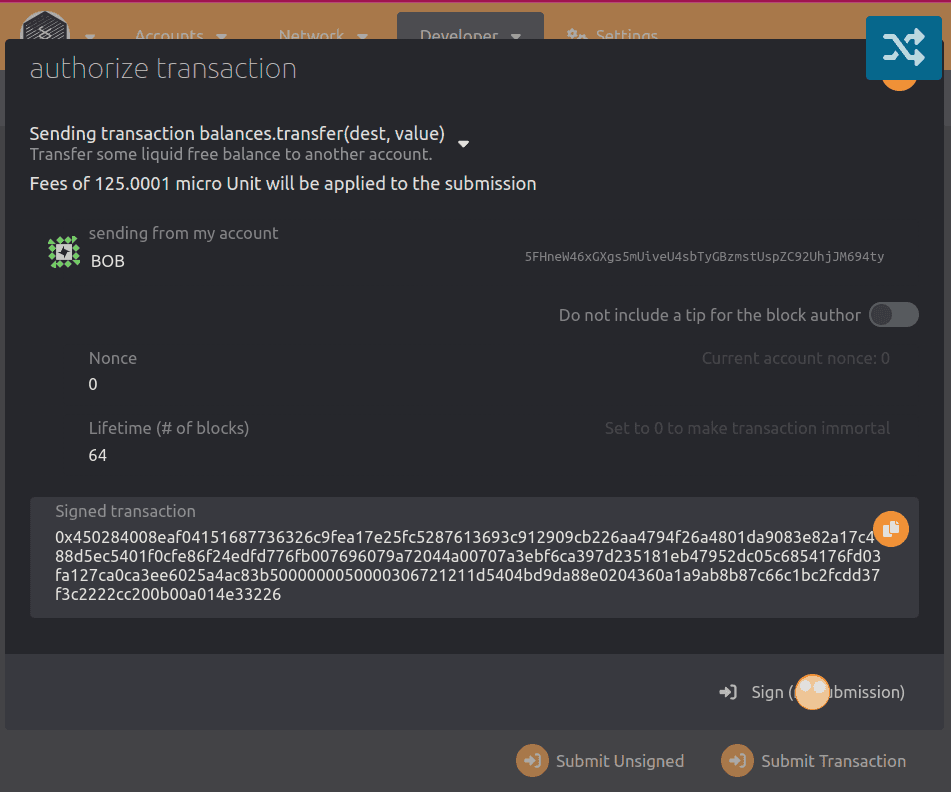
Submit Transactionbutton (lower right) and un-check sign and submit to generate a signed transaction with the defaultnonce = 0andLifetime = 64for inspection

- Encoded call data:
0x050300306721211d5404bd9da88e0204360a1a9ab8b87c66c1bc2fcdd37f3c2222cc200b00a014e33226 - Encoded call hash:
0x26c333c22ec93ac431ee348168530b7d77e85d766f130af60890c0fd6ab20d5b - Resulting signed transaction call hash:
0x450284008eaf04151687736326c9fea17e25fc5287613693c912909cb226aa4794f26a48018eeaeb6a3496444c08b5c3e10e0c5f94776774591504ef4ef26e3873799831285a1a7cbd8ba2babe6fba94ea3585bf20e46c80ce7baeb25b149529ece931478c45020c00050000306721211d5404bd9da88e0204360a1a9ab8b87c66c1bc2fcdd37f3c2222cc200b00a014e33226

Here you can Copy the Signed transaction data to submit via RPC directly, or for inspection on the Developer -> Extrinsics -> Decode section.
We will use this window now to submit the transaction and watch the result.
- Close the
authorize transactioncard - Click
Submit Transactionbutton (lower right) and keep sign and submit checked - Navigate to the
Developer->RPC Callstab
In the RPC tab, you should see the result of your author_submitAndWatchExtrinsic call as something similar to:
{
  dispatchInfo: {
    weight: 159,200,000
    class: Normal
    paysFee: Yes
  }
  events: [
    {
      phase: {
        ApplyExtrinsic: 1
      }
      event: {
        method: Withdraw
        section: balances
        index: 0x0508
        data: {
          who: 5FHneW46xGXgs5mUiveU4sbTyGBzmstUspZC92UhjJM694ty
          amount: 125,000,147
        }
      }
      topics: []
    }
    {
      phase: {
        ApplyExtrinsic: 1
      }
      event: {
        method: NewAccount
        section: system
        index: 0x0003
        data: {
          account: 5DAAnrj7VHTznn2AWBemMuyBwZWs6FNFjdyVXUeYum3PTXFy
        }
      }
      topics: []
    }
    {
      phase: {
        ApplyExtrinsic: 1
      }
      event: {
        method: Endowed
        section: balances
        index: 0x0500
        data: {
          account: 5DAAnrj7VHTznn2AWBemMuyBwZWs6FNFjdyVXUeYum3PTXFy
          freeBalance: 42,000,000,000,000
        }
      }
      topics: []
    }
    {
      phase: {
        ApplyExtrinsic: 1
      }
      event: {
        method: Transfer
        section: balances
        index: 0x0502
        data: {
          from: 5FHneW46xGXgs5mUiveU4sbTyGBzmstUspZC92UhjJM694ty
          to: 5DAAnrj7VHTznn2AWBemMuyBwZWs6FNFjdyVXUeYum3PTXFy
          amount: 42,000,000,000,000
        }
      }
      topics: []
    }
    {
      phase: {
        ApplyExtrinsic: 1
      }
      event: {
        method: ExtrinsicSuccess
        section: system
        index: 0x0000
        data: {
          dispatchInfo: {
            weight: 159,200,000
            class: Normal
            paysFee: Yes
          }
        }
      }
      topics: []
    }
  ]
  status: {
    InBlock: 0x501c8f15883bb2b686fb5ea1ca35e99dace8bd6216bfc571a31d7088aea000f7
  }
}- Navigate to the
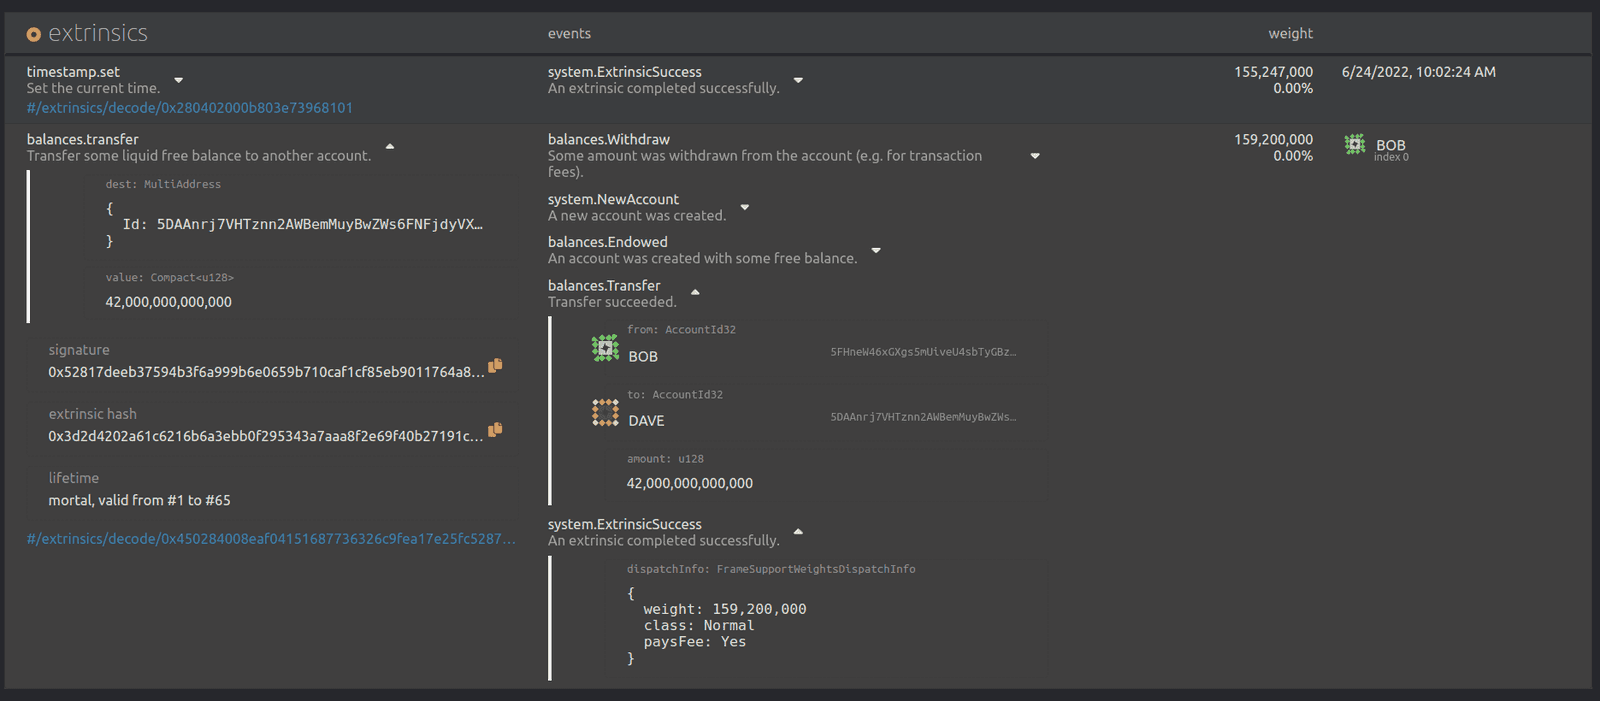
Network->Explorertab - Open the
balances.Transferextrinsic details by clicking the<block number>-<extrinsic number>in the top right of the card - Inspect the on-chain details of your transaction

Click the #/extrinsics/decode/0x.... link to open the decoded details of the above Signed transaction data and notice it is identical to what we submitted.
Thus before or after submitting an extrinsic, this tool can be used to decode and introspect transaction call data.
Signed extensions
Substrate provides the concept of signed extensions to extend an extrinsic with additional data, provided by the SignedExtension trait.
The transaction queue regularly calls signed extensions to keep checking that a transaction is valid before it gets put in the ready queue. This is a useful safeguard for verifying that transactions won't fail in a block. They are commonly used to enforce validation logic to protect the transaction pool from spam and replay attacks.
In FRAME, a signed extension can hold any of the following types by default:
AccountId: to encode the sender's identity.Call: to encode the pallet call to be dispatched. This data is used to calculate transaction fees.AdditionalSigned: to handle any additional data to go into the signed payload. This makes it possible to attach any custom logic prior to dispatching a transaction.Pre: to encode the information that can be passed from before a call is dispatch to after it gets dispatched.
FRAME's system pallet provides a set of useful SignedExtensions out of the box.
Practical examples
An important signed extension for validating transactions is CheckSpecVersion.
It provides a way for the sender to provide the spec version as a signed payload attached to the transaction.
Since the spec version is already known in the runtime, the signed extension can perform a simple check to verify that the spec versions match.
If they don't, the transaction fail before it gets put in the transaction pool.
Other examples include the signed extensions used to calculate transaction priority. These are:
CheckWeight: sets the value for priority to0for all dispatch classes.ChargeTransactionPayment: calculates the overall priority, modifying the priority value accordingly.
The priority depends on the dispatch class and the amount of tip-per-weight or tip-per-length (whatever is more limiting) the sender is willing to pay.
Transactions without a tip use a minimal tip value of 1 for priority calculations to make sure that not all transactions end up having a priority of 0.
The consequence of this is that smaller transactions are preferred over larger ones.
Where to go next
Now that you have seen how transactions are constructed, you might want to review how they progress from the transaction pool to the runtime and get added to blocks or how to use tools that enable you to submit transactions offline or using a REST API.
- Transaction lifecycle
- Transactions, weights, and fees
- tx-wrapper for offline transactions
- sidecar for REST-based transactions
