Connect a local parachain
This tutorial illustrates how to reserve a parachain identifier with a local relay chain and how to connect a local parachain to that relay chain.
Tutorial objectives
By completing this tutorial, you will accomplish the following objectives:
- Compile a local parachain node.
- Reserve a unique identifier with the local relay chain for the parachain to use.
- Configure a chain specification for the parachain.
- Export the runtime and genesis state for the parachain.
- Start the local parachain and see that it connects to the local relay chain.
Before you begin
Before you begin, verify the following:
- You have configured a local relay chain with two validators as described in Prepare a local relay chain.
-
You are aware that parachain versions and dependencies are tightly coupled with the version of the relay chain they connect to and know the software version you used to configure the relay chain.
Tutorials generally use the latest Polkadot branch to demonstrate features. If a tutorial doesn't work as expected, you should check whether you have the latest Polkadot branch in your local environment and update your local software, if needed.
Build the parachain template
This tutorial uses the Substrate parachain template to illustrate how to launch a parachain that connects to a local relay chain. The parachain template is similar to the node template used in solo chain development. You can also use the parachain template as the starting point for developing a custom parachain project.
To build the parachain template:
- Open a new terminal shell on your computer, if needed.
-
Clone the branch of the
substrate-parachain-templaterepository that matches the release branch you used to configure the relay chain.For example, if you used the
release-v1.0.0Polkadot release branch to configure the local relay chain, use thepolkadot-v1.0.0branch for the parachain template.git clone --depth 1 --branch polkadot-v1.0.0 https://github.com/substrate-developer-hub/substrate-parachain-template.git -
Change to the root of the parachain template directory by running the following command:
cd substrate-parachain-templateYou now have a detached branch. If you want to save your changes and make this branch easy to identify you can create a new branch by running a command similar to the following:
git switch -c my-branch-v1.0.0 -
Build the parachain template collator by running the following command:
cargo build --releaseCompiling the node can take up to 60 minutes, depending on your hardware and software configuration.
Reserve a unique identifier
Every parachain must reserve a unique identifier—the ParaID—that enables it to connect to its specific relay chain.
Each relay chain manages its own set of unique identifiers for the parachains that connect to it.
The identifier is referred to as a ParaID because the same identifier can be used to identify a slot occupied by a parachain or to identify a slot occupied by a parathread.
You should note that you must have an account with sufficient funds to reserve a slot on a relay chain.
You can determine the number of tokens a specific relay chain requires by checking the ParaDeposit configuration in the paras_registrar pallet for that relay chain.
For example, Rococo requires 5 ROC to reserve an identifier:
parameter_types! {
	pub const ParaDeposit: Balance = 5 * DOLLARS;
	pub const DataDepositPerByte: Balance = deposit(0, 1);
}

impl paras_registrar::Config for Runtime {
	type RuntimeEvent = RuntimeEvent;
	type RuntimeOrigin = RuntimeOrigin;
	type Currency = Balances;
	type OnSwap = (Crowdloan, Slots);
	type ParaDeposit = ParaDeposit;
	type DataDepositPerByte = DataDepositPerByte;
	type WeightInfo = weights::runtime_common_paras_registrar::WeightInfo<Runtime>;
}
Each relay chain allots its own identifiers by incrementing the identifier starting at 2000 for all chains that are not common good parachains.
Common good chains use a different method to allocate slot identifiers.
To reserve a parachain identifier:
- Validate your local relay chain validators are running.
- Open the Polkadot/Substrate Portal in a browser.
- Connect to a local relay chain node.
-
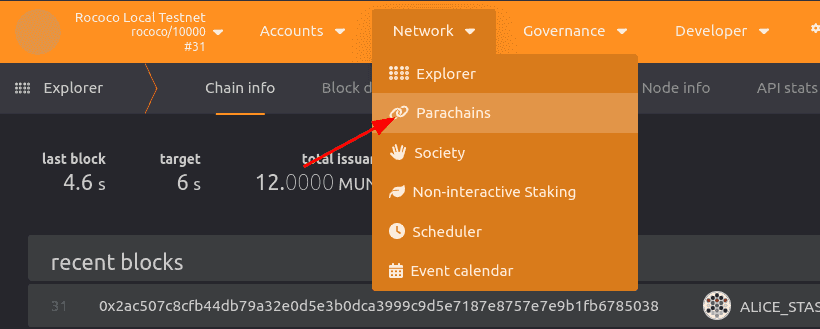
Click Network and select Parachains.
![Navigate to Parachains]()
-
Click Parathreads, then click ParaId.
![Reserve an identifier]()
-
Review the settings for the transaction to reserve the identifier, then click Submit.
The account used to reserve the identifier will be the account charged for the transaction and will be the origin account for the parathread associated with the identifier.
-
Click Sign and Submit to authorize the transaction.
After you submit the transaction, click Network and select Explorer.
- Check the list of recent events for successful
registrar.Reservedand click the event to see details about the transaction.
You are now ready to prepare the chain specification and generate the files required for your parachain to connect to the relay chain using the reserved identifier (paraId 2000).
Modify the default chain specification
To register your parachain with the local relay chain, you must modify the default chain specification to use the parachain identifier you have reserved.
-
Generate the plain text chain specification for the parachain template node by running the following command:
./target/release/parachain-template-node build-spec --disable-default-bootnode > plain-parachain-chainspec.json - Open the plain text chain specification for the parachain template node in a text editor.
-
Set the
para_idto the parachain identifier that you previously reserved.For example, if your reserved identifier is
2000, set thepara_idfield to2000:... "relay_chain": "rococo-local", "para_id": 2000, "codeSubstitutes": {}, "genesis": { ... } -
Set the
parachainIdto the parachain identifier that you previously reserved.For example, if your reserved identifier is
2000, set thepara_idfield to2000:... "parachainSystem": null, "parachainInfo": { "parachainId": 2000 }, ... - If you are completing this tutorial at the same time as anyone on the same local network, then an additional step is needed to prevent accidentally peering with their nodes. Find the following line and add characters to make your protocolId unique:
"protocolId": "template-local"- Save your changes and close the plain text chain specification file.
-
Generate a raw chain specification file from the modified chain specification file by running the following command:
./target/release/parachain-template-node build-spec --chain plain-parachain-chainspec.json --disable-default-bootnode --raw > raw-parachain-chainspec.jsonThe command generates a new raw chain specification file with two collators.
2022-08-30 13:00:50 Building chain spec
2022-08-30 13:00:50 assembling new collators for new session 0 at #0
2022-08-30 13:00:50 assembling new collators for new session 1 at #0
Prepare the parachain collator
With the local relay chain running and the raw chain specification for the parachain template updated, you are ready to start the parachain collator node and export information about its runtime and genesis state.
To prepare the parachain collator to be registered:
-
Export the WebAssembly runtime for the parachain.
The relay chain needs the parachain-specific runtime validation logic to validate parachain blocks. You can export the WebAssembly runtime for a parachain collator node by running a command similar to the following:
./target/release/parachain-template-node export-genesis-wasm --chain raw-parachain-chainspec.json para-2000-wasm -
Generate a parachain genesis state.
To register a parachain, the relay chain needs to know the genesis state of the parachain. You can export the entire genesis state—hex-encoded—to a file by running a command similar to the following:
./target/release/parachain-template-node export-genesis-state --chain raw-parachain-chainspec.json para-2000-genesis-stateYou should note that the runtime and state you export must be for the genesis block. You can't connect a parachain with any previous state to a relay chain. All parachains must start from block 0 on the relay chain. See Convert a solo chain for details on how the parachain template was created and how to convert the chain logic—not its history or state migrations—to a parachain.
-
Start a collator node with a command similar to the following:
./target/release/parachain-template-node \
--alice \
--collator \
--force-authoring \
--chain raw-parachain-chainspec.json \
--base-path /tmp/parachain/alice \
--port 40333 \
--rpc-port 8844 \
-- \
--execution wasm \
--chain ../polkadot/raw-local-chainspec.json \
--port 30343 \
--rpc-port 9977
In this command, the arguments passed before the lone
--argument are for the parachain template collator. The arguments after the--are for the embedded relay chain node. Notice that this command specifies both the raw chain specification for the parachain and the raw chain specification for the relay chain. In this example, the raw chain specification for the local relay chain israw-local-chainspec.jsonlocated in thepolkadotdirectory. Be sure the second--chaincommand-line specifies the path to the raw chain specification for your local relay chain.If you start another node for the parachain, you would use the same relay chain specification file, but a different base path and port numbers.
In the terminal where you started the parachain template node, you should see output similar to the following:
Parachain Collator Template
✌️  version 0.1.0-336530d3bdd
❤️  by Anonymous, 2020-2023
📋 Chain specification: Local Testnet
🏷  Node name: Alice
👤 Role: AUTHORITY
💾 Database: RocksDb at /tmp/parachain/alice/chains/local_testnet/db/full
no effect anymore and will be removed in the future!
Parachain Account: 5Ec4AhPUwPeyTFyuhGuBbD224mY85LKLMSqSSo33JYWCazU4
Is collating: yes
[Relaychain] 🏷  Local node identity is: 12D3KooWR8wJbGWrjzKTpuXQvbuM1rE2GAE9JVEFEwAyNX6LV9nN
[Relaychain] 💻 Operating system: ...
......
[Relaychain] 📦 Highest known block at #95
[Relaychain] Running JSON-RPC server: addr=127.0.0.1:9977, allowed origins=["http://localhost:*", "http://127.0.0.1:*", "https://localhost:*", "https://127.0.0.1:*", "https://polkadot.js.org"]
[Relaychain] 〽️ Prometheus exporter started at 127.0.0.1:9616
[Parachain] 🏷  Local node identity is: 12D3KooWF464pkLaHbsfc4DzDkYuhdVE4zSqBHR1gPapLvwsfZtg
[Relaychain] discovered: 12D3KooWCq8n5PzroHvxEyCbHigb5ZWc6q8WL7E25iuWYbJod9D2 /ip4/10.105.172.196/tcp/30334
[Relaychain] discovered: 12D3KooWCzfdGstKxFiZ5QdKQVmQVgcBgE8r7FfBrG8bCRsia6Bo /ip4/10.105.172.196/tcp/30333
[Relaychain] discovered: 12D3KooWCzfdGstKxFiZ5QdKQVmQVgcBgE8r7FfBrG8bCRsia6Bo /ip4/10.96.0.2/tcp/30333
[Relaychain] discovered: 12D3KooWCq8n5PzroHvxEyCbHigb5ZWc6q8WL7E25iuWYbJod9D2 /ip4/10.96.0.2/tcp/30334
[Parachain] 💻 Operating system: ...
......
[Parachain] 📦 Highest known block at #0
[Parachain] Running JSON-RPC server: addr=127.0.0.1:8844, allowed origins=["http://localhost:*", "http://127.0.0.1:*", "https://localhost:*", "https://127.0.0.1:*", "https://polkadot.js.org"]
...
You should see the template collator node running as a standalone node and its relay node connecting as a peer with the local relay chain validator nodes. If you don't see the embedded relay chain peering with local relay chain node, try disabling your firewall or adding the
bootnodesparameter with the relay node's address.It has not started authoring parachain blocks yet. Authoring will begin when the collator is actually registered on the relay chain.
Register with the local relay chain
With the local relay chain and collator node running, you are ready to register the parachain on the local relay chain. In a live public network, registration typically involves a parachain auction. For this tutorial and local testing, you can use a Sudo transaction and the Polkadot/Substrate Portal. Using a Sudo transaction enables you to bypass the steps required to acquire a parachain or parathread slot.
To register the parachain:
- Validate your local relay chain validators are running.
- Open the Polkadot/Substrate Portal in a browser.
- Connect to a local relay chain node, if needed.
-
Click Developer and select Sudo.
![Select Sudo to register a parachain]()
-
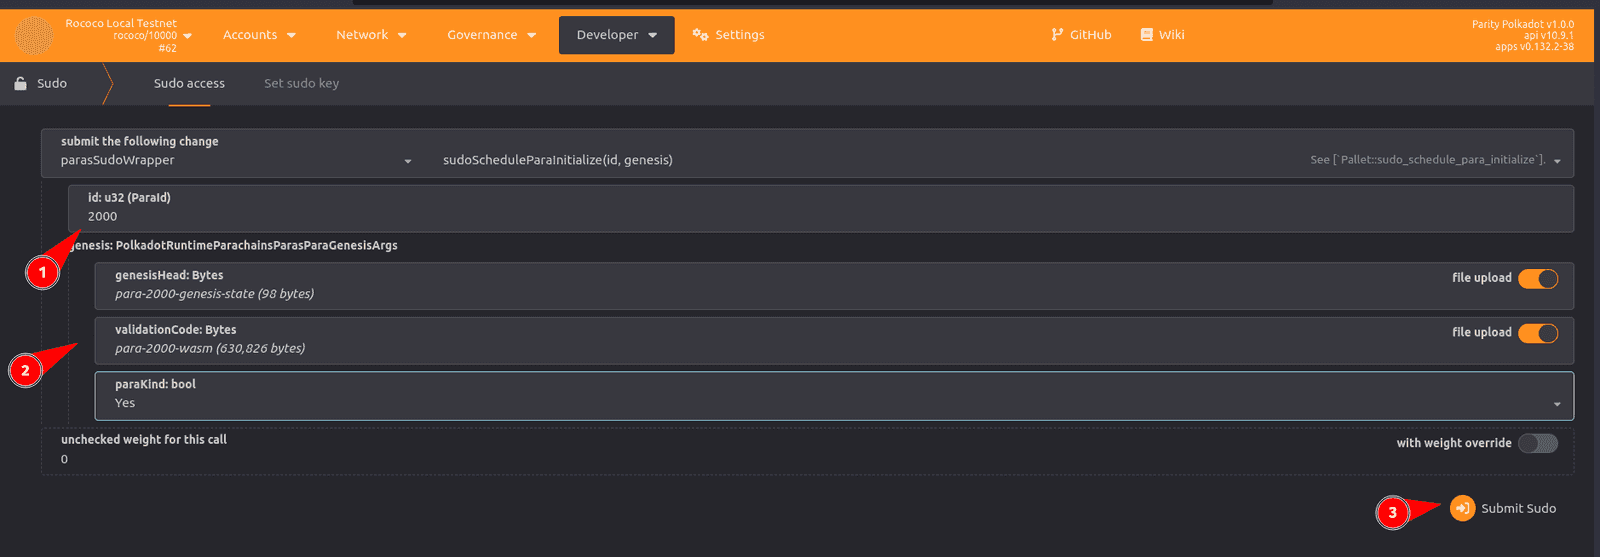
Select paraSudoWrapper, then select sudoScheduleParaInitialize(id, genesis) to initialize the reserved paraID at the start of the next relay chain session.
For the transaction parameters:
id: Type your reservedParaId. For this tutorial, the reserved identifier is 2000.genesisHead: Click file upload and upload the genesis state you exported for the parachain. For this tutorial, select thepara-2000-genesisfile.validationCode: Click file upload and upload the WebAssembly runtime you exported for the parachain For this tutorial, select thepara-2000-wasmfile.paraKind: Select Yes.
![Set parameters for registration]()
- Click Submit Sudo.
-
Review the transaction details, then click Sign and Submit to authorize the transaction.
After you submit the transaction, click Network and select Explorer.
-
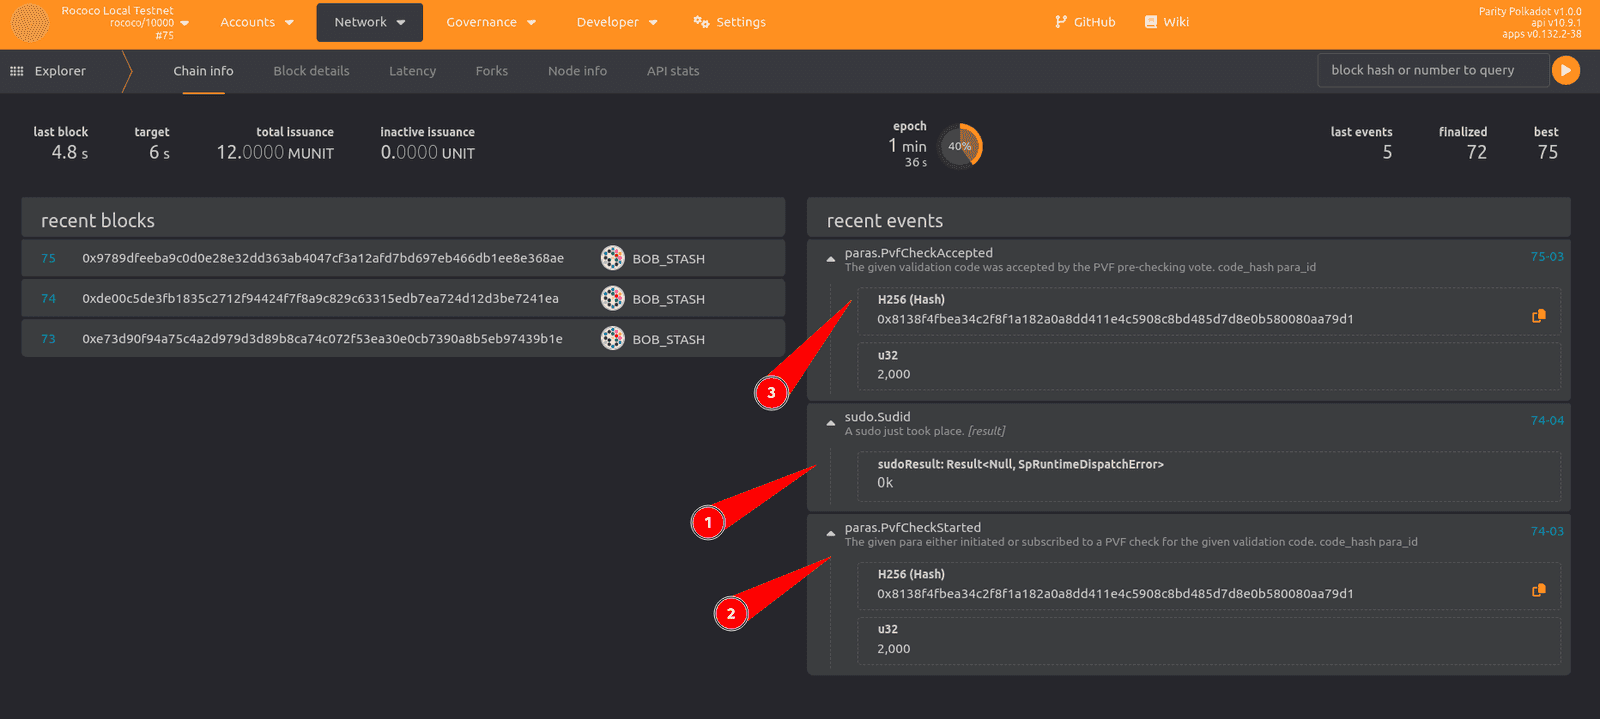
Check the list of recent events for successful
sudo.Sudidandparas.PvfCheckAcceptedand click the event to see details about the transaction.![View the Sudo registration event]()
After the parachain is initialized, you can see it in the Polkadot/Substrate Portal by clicking Network, then selecting Parachains.
-
Click Network and select Parachains and wait for a new epoch to start.
The relay chain tracks the latest block—the head—of each parachain. When a relay chain block is finalized, the parachain blocks that have completed the validation process are also finalized. This is how Polkadot achieves pooled, shared security for its parachains.
After the parachain connects to the relay chain in the next epoch and finalizes its first block you can see information about it in the Polkadot/Substrate Portal.
The terminal where the parachain is running also displays details similar to the following:
[Relaychain] 💤 Idle (2 peers), best: #90 (0x5f73…1ccf), finalized #87 (0xeb50…68ea), ⬇ 1.4kiB/s ⬆ 1.1kiB/s
[Parachain] 💤 Idle (0 peers), best: #0 (0x3626…fef3), finalized #0 (0x3626…fef3), ⬇ 1.2kiB/s ⬆ 0.7kiB/s
[Relaychain] 💤 Idle (2 peers), best: #90 (0x5f73…1ccf), finalized #88 (0xd43c…c3e6), ⬇ 0.7kiB/s ⬆ 0.5kiB/s
[Parachain] 💤 Idle (0 peers), best: #0 (0x3626…fef3), finalized #0 (0x3626…fef3), ⬇ 1.0kiB/s ⬆ 0.6kiB/s
[Relaychain] 👶 New epoch 9 launching at block 0x1c93…4aa9 (block slot 281848325 >= start slot 281848325).
[Relaychain] 👶 Next epoch starts at slot 281848335
[Relaychain] ✨ Imported #91 (0x1c93…4aa9)
[Parachain] Starting collation. relay_parent=0x1c936289cfe15fabaa369f7ae5d73050581cb12b75209c11976afcf07f6a4aa9 at=0x36261113c31019d4b2a1e27d062e186f46da0e8f6786177dc7b35959688ffef3
[Relaychain] 💤 Idle (2 peers), best: #91 (0x1c93…4aa9), finalized #88 (0xd43c…c3e6), ⬇ 1.2kiB/s ⬆ 0.7kiB/s
[Parachain] 💤 Idle (0 peers), best: #0 (0x3626…fef3), finalized #0 (0x3626…fef3), ⬇ 0.2kiB/s ⬆ 37 B/s
[Relaychain] ✨ Imported #92 (0x557c…9f73)
[Parachain] Starting collation. relay_parent=0x557c8c611fdcb6aa86161df3ca71cad71ea159e7213ca36f1ed6b82393b19f73 at=0x36261113c31019d4b2a1e27d062e186f46da0e8f6786177dc7b35959688ffef3
[Parachain] 🙌 Starting consensus session on top of parent 0x36261113c31019d4b2a1e27d062e186f46da0e8f6786177dc7b35959688ffef3
[Parachain] 🎁 Prepared block for proposing at 1 (0 ms) [hash: 0x55f3ff62e12bd14385fcb4d386df5469d7360401a3f93ddb944aa0a023f9854a; parent_hash: 0x3626…fef3; extrinsics (2): [0x3e2c…53d1, 0x9080…1966]
[Parachain] 🔖 Pre-sealed block for proposal at 1. Hash now 0xc905d5b68c052c996d9a4d4863329d24fb6c5f0372f52469ccb909c886025df2, previously 0x55f3ff62e12bd14385fcb4d386df5469d7360401a3f93ddb944aa0a023f9854a.
[Parachain] ✨ Imported #1 (0xc905…5df2)
[Parachain] PoV size { header: 0.2177734375kb, extrinsics: 2.8740234375kb, storage_proof: 1.7783203125kb }
[Parachain] Compressed PoV size: 4.279296875kb
[Parachain] Produced proof-of-validity candidate. block_hash=0xc905d5b68c052c996d9a4d4863329d24fb6c5f0372f52469ccb909c886025df2
[Relaychain] 💤 Idle (2 peers), best: #92 (0x557c…9f73), finalized #89 (0x37ea…8ef3), ⬇ 1.4kiB/s ⬆ 1.7kiB/s
[Parachain] 💤 Idle (0 peers), best: #0 (0x3626…fef3), finalized #0 (0x3626…fef3), ⬇ 0.2kiB/s ⬆ 0.2kiB/s
[Relaychain] ✨ Imported #93 (0xed3c…0ba3)
[Relaychain] ✨ Imported #93 (0x2bf8…02c4)
[Relaychain] 💤 Idle (2 peers), best: #93 (0xed3c…0ba3), finalized #90 (0x5f73…1ccf), ⬇ 1.7kiB/s ⬆ 0.9kiB/s
[Parachain] 💤 Idle (0 peers), best: #0 (0x3626…fef3), finalized #0 (0x3626…fef3), ⬇ 0.2kiB/s ⬆ 0.1kiB/s
[Relaychain] 👴 Applying authority set change scheduled at block #91
[Relaychain] 👴 Applying GRANDPA set change to new set [(Public(88dc3417d5058ec4b4503e0c12ea1a0a89be200fe98922423d4334014fa6b0ee (5FA9nQDV...)), 1), (Public(d17c2d7823ebf260fd138f2d7e27d114c0145d968b5ff5006125f2414fadae69 (5GoNkf6W...)), 1)]
[Relaychain] ✨ Imported #94 (0xc141…1732)
[Parachain] Starting collation. relay_parent=0xc141dbb2f9f5108e0cfe4c4c08ced2c48e718c94dc58127e07428b42a80b1732 at=0xc905d5b68c052c996d9a4d4863329d24fb6c5f0372f52469ccb909c886025df2
[Relaychain] Trying to remove unknown reserved node 12D3KooWCzfdGstKxFiZ5QdKQVmQVgcBgE8r7FfBrG8bCRsia6Bo from SetId(3).
[Relaychain] 💤 Idle (2 peers), best: #94 (0xc141…1732), finalized #91 (0x1c93…4aa9), ⬇ 0.7kiB/s ⬆ 0.5kiB/s
[Parachain] 💤 Idle (0 peers), best: #1 (0xc905…5df2), finalized #0 (0x3626…fef3), ⬇ 0.2kiB/s ⬆ 0.1kiB/s
...
Connect and submit transactions
Up to this point, you have used the Polkadot/Substrate Portal to connect to the local network and to submit transactions to the local relay chain. Now that you have a parachain running and connected to the relay chain, you can use the Polkadot/Substrate Portal to submit transactions to the parachain.
To connect to the parachain and submit transactions:
- Open Polkadot/Substrate Portal in a new browser window or tab.
- Click the network selector in the top left of the application.
-
Change the custom endpoint to connect to the WebSocket port for the parachain.
If you followed the settings in this tutorial, connect to port `8844
. -
Click Account and select Transfer to send funds from Alice to another account.
- Select an account to send the funds to.
- Type an amount.
- Click Make Transfer.
- Review the transaction, then click Sign and Submit to authorize the transfer.
-
Click Accounts to verify that the transfer completed and the parachain transaction was successful.
If the transaction was successful, you have a working parachain.
Resetting the blockchain state
The parachain collator you connected to the relay chain in this tutorial contains all of the blockchain data for the parachain. There's only one node in this parachain network, so any transactions you submit are only stored on this node. Relay chains don't store any parachain state. The relay chain only stores header information for the parachains that connect to it.
For testing purposes, you might want to periodically purge the blockchain state to start over. However, you should keep in mind that if you purge the chain state or manually delete the database, you wont be able to recover the data or restore the chain state. If you have data you want to preserve, you should ensure you have a copy before you purge the parachain state.
If you want to start over with a clean environment for testing, you should completely remove the chain state for the local relay chain nodes and the parachain.
To reset the blockchain state:
- In the terminal where the parachain template node is running, press Control-c.
-
Purge the parachain collator state by running the following command:
rm -rf /tmp/parachain - In the terminal where either the
alicevalidator node or thebobvalidator node is running, press Control-c. -
Purge the validator state by running the following command:
rm -rf /tmp/relay


